WireGuard VPN on pfSense Router

WireGuard is designed to be simpler and more efficient than other VPN protocols, such as OpenVPN and IPSec. It uses modern cryptographic algorithms and is implemented entirely in user space, which means it runs as a regular program and doesn't require kernel modifications.

WireGuard is known for its fast speeds and low latency, which makes it ideal for use in real-time applications, such as online gaming or video conferencing. It also has a small codebase, which makes it easier to audit for security vulnerabilities.
In this guide we will be setting up Wireguard on pfSense Router.
Installation Guide
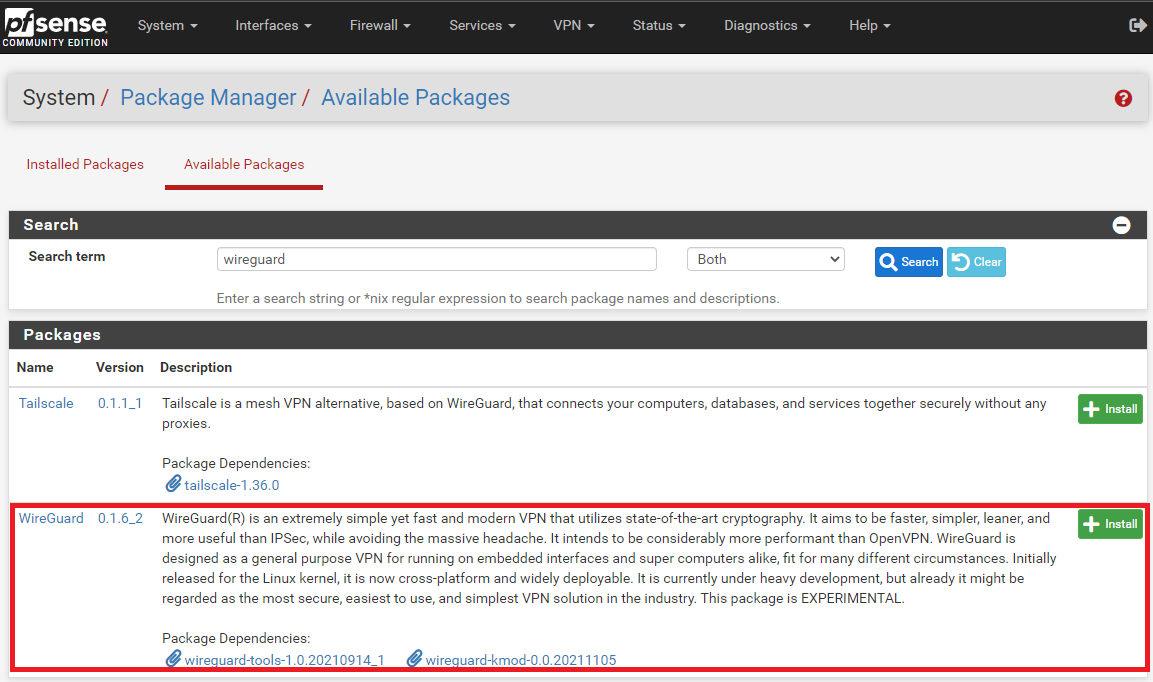
- Install WireGuard package on pfSense.
Navigate to System > Package Manager > Available Package, then search for WireGuard and Install the package.
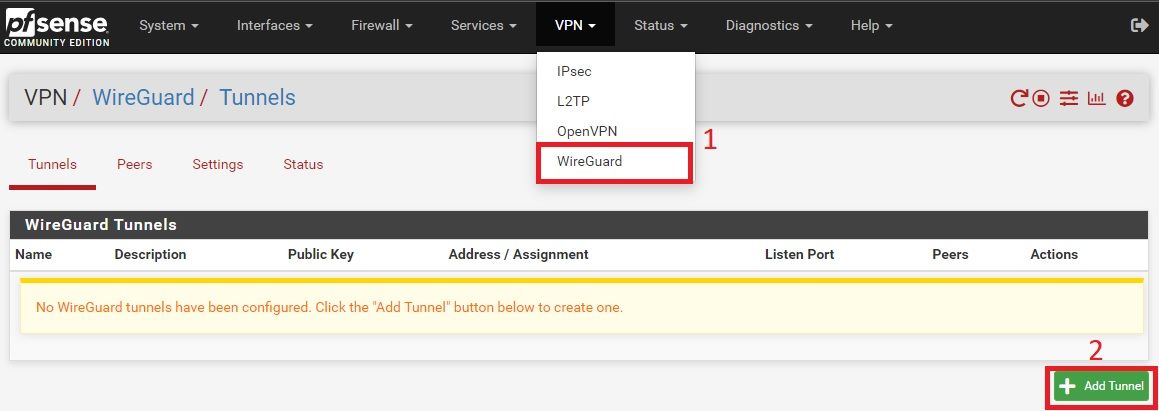
2. Create WireGuard Tunnel
Select VPN > WireGuard, then Click on Add Tunnel
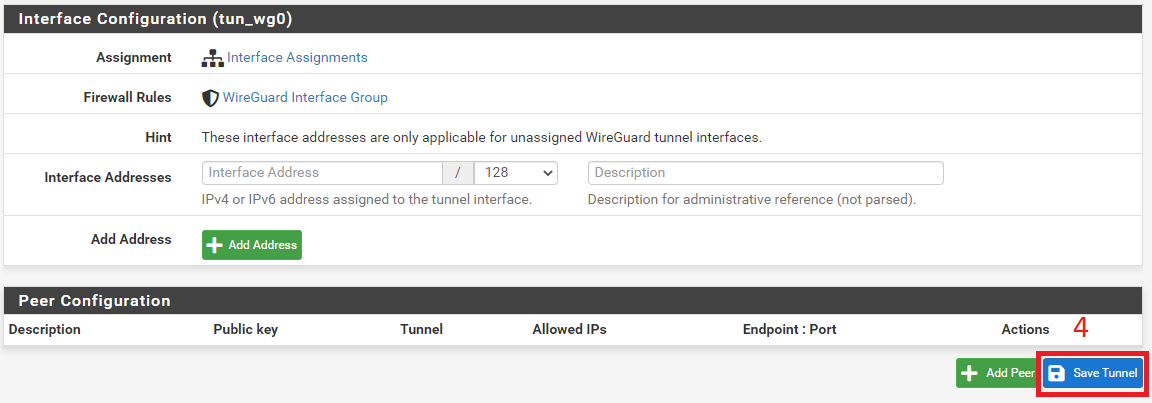
2.1 Tunnel Configuration
Fill in the following fields as shown on the screenshot.
- Description - WireGuard
- Listen Port - 51820
- Interface - Click on 'Generate' which would generate Public Key - Make a note of this key in notepad, as we will be using it later.
- save the settings by clicking on 'Save Tunnel' at end of the page.
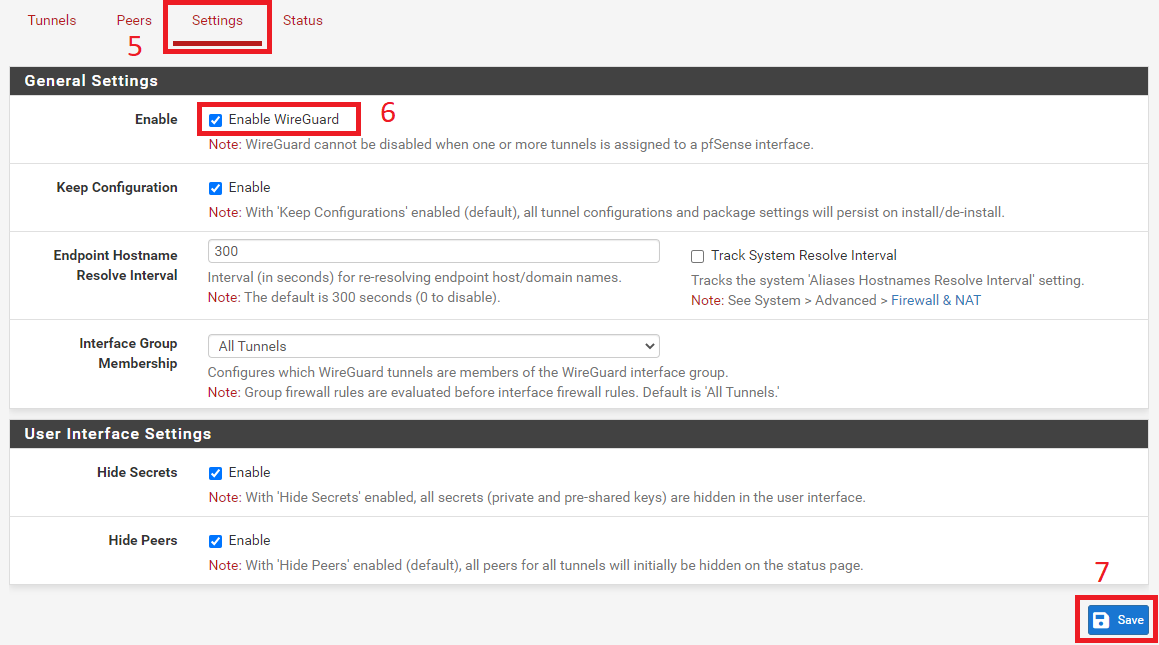
- Select 'Settings' Option
- Tick the box to Enable WireGuard, and Save the settings
- Ensure to Apply the Settings once you have saved.

3. Interface Set-up
Go to Interface > Assignment
At the Available Network Ports - Select Tunnel we just created, then click on 'Add'
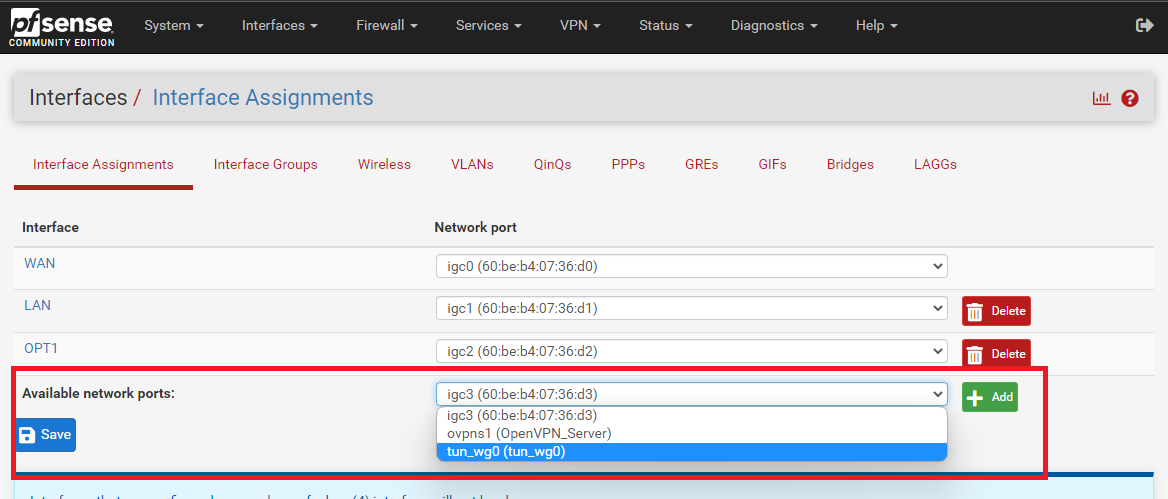
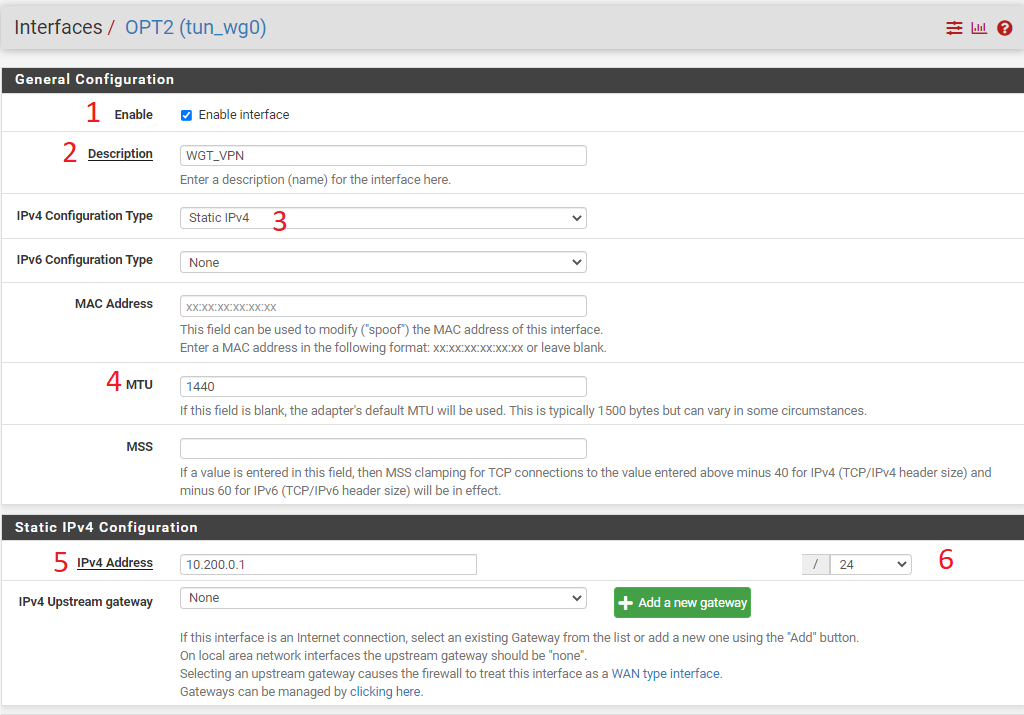
Once added , It will shows OPT# (number), click on OPT# to configure the settings.

- Enable Interface
- Provide a description - WGT_VPN
- Select Static - IPv4
- MTU - 1440
- Enter the IPv4 Address - 10.200.0.1
- Change subnet mask to 24
- Save the settings, then click on Apply Changes
4. Create Firewall Rules
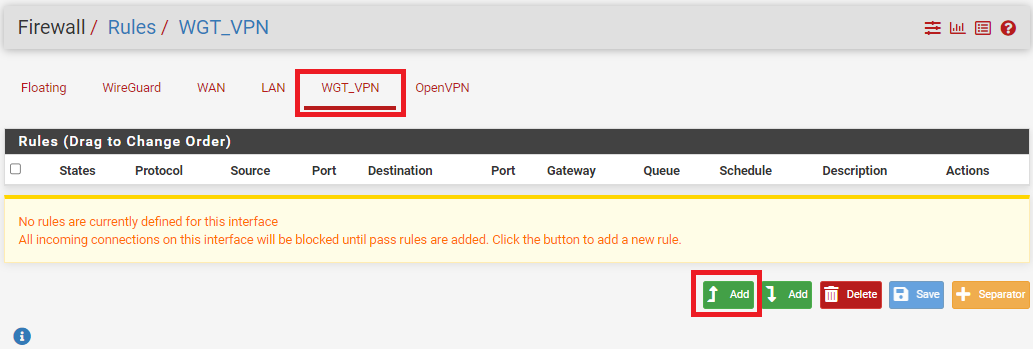
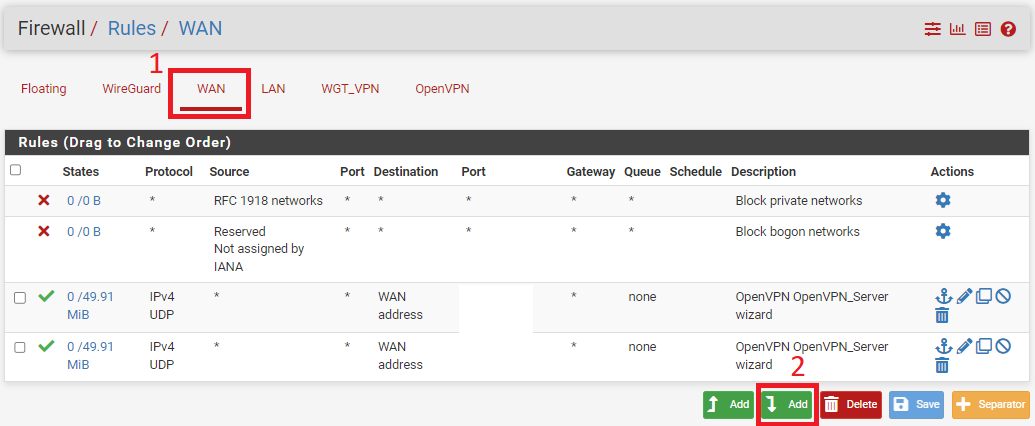
Go to > Firewall > Rules
Select WGT_VPN interface we have just created, then select Add
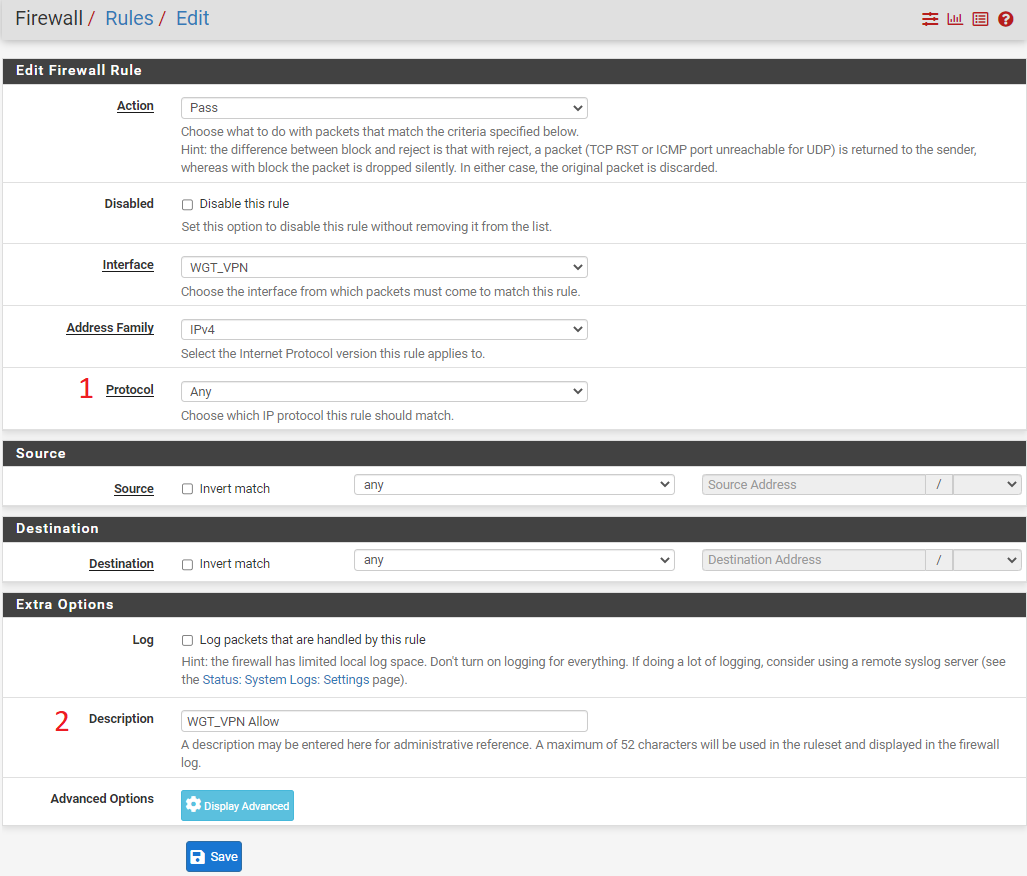
- Change Protocol - Any
- Give Description to Firewall - WGT_VPN Allow
- Save and apply the changes
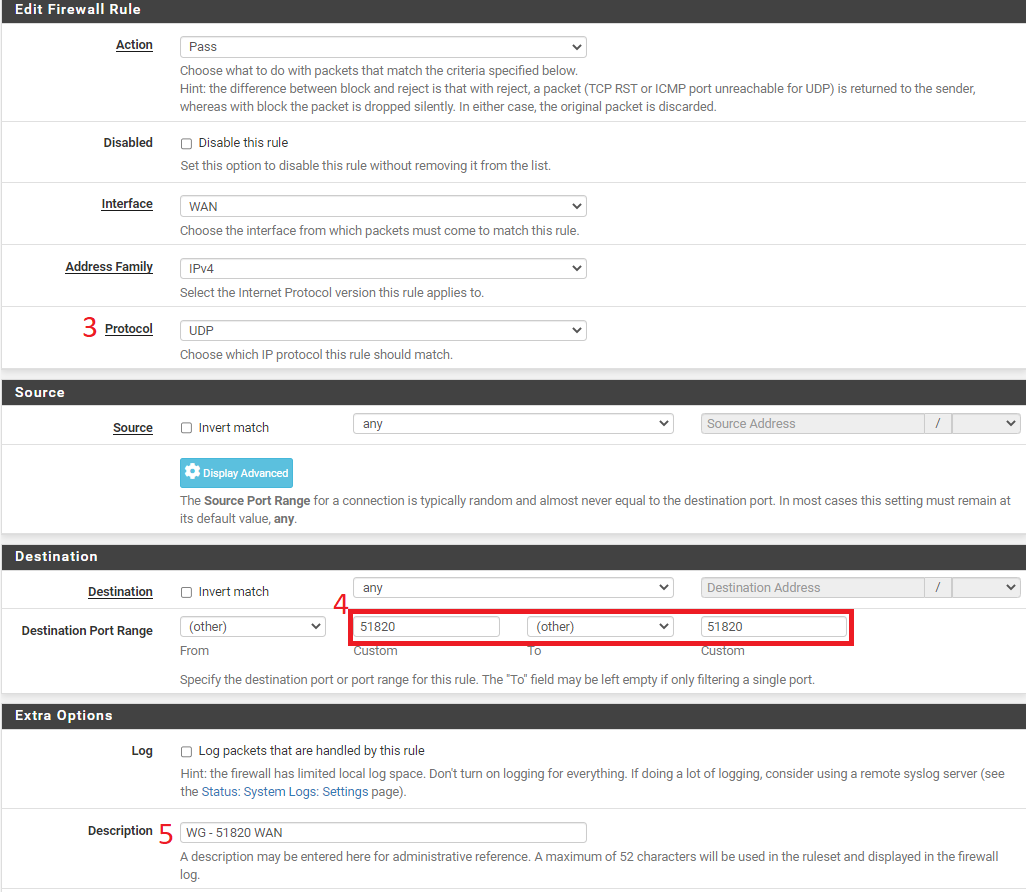
4.1 Creating a WAN Rules
This will allow us to Access WireGuard from Outside of our LAN
- Change Protocol to - UDP
- Entre Port range. We gave default port - 51820
- Give description to WAN Rule - WG 51820 WAN
- Save and Apply the settings
5. Peer & Client Set-up
Pfsense WireGuard will be acting as a server, and Clients will be any devices we will be using to Access WireGuard VPN into our Network.
Clients can be any devices e.g. Smart Phone, Laptop. Desktop, tablet.etc.
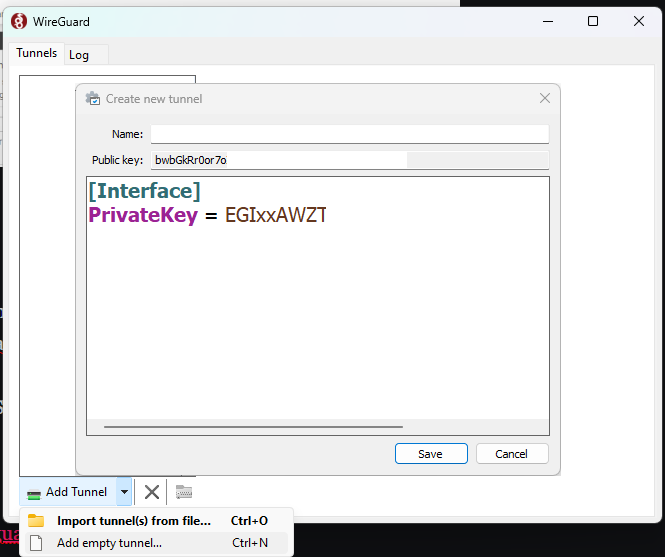
Windows Client Set-up
- Download and Install Wireguard for Windows
2. Select to Add empty Tunnel..
3. Copy and past Public key on notepad for later use
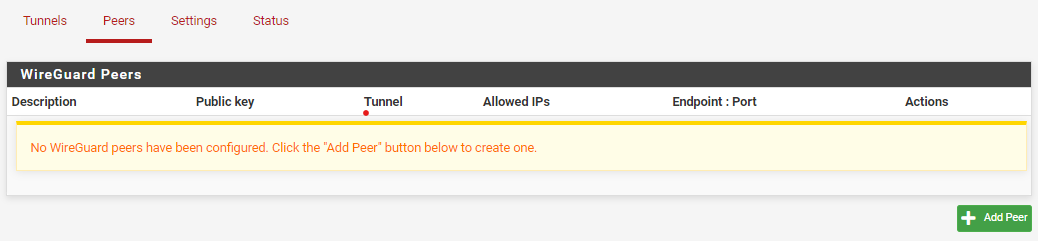
6. Create a Peer on pfSense
Go to VPN > WireGuard > Peers
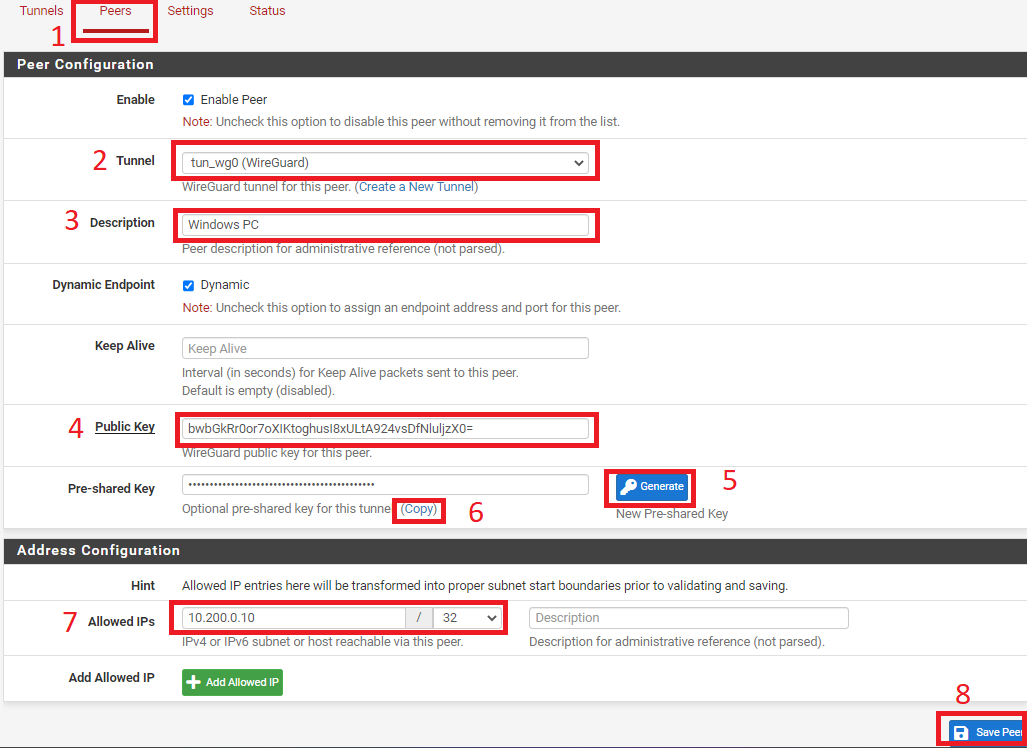
Click on Add Peer configure the settings
- After selecting Add Peer, select Peers
- Select WireGuard tunnel from Tunnel option
- Provide description depending on your client - Windows PC
- Paste the Public Key from Client (Windows PC)
- Click on Generate create Pre-shared Key - This provides an extra layer of security, as this confirms if the Client and Server has exact Pre-shared Key.
- Allowed IPs - Choose an IP address for our clients to use - 10.200.0.10
- Save and apply the settings
6.1 Configuring peers (Client)
Go to back to WireGuard Client on Windows PC where we have copied the Public key, then copy and paste the following field as shown on the screenshot.
Address =
DNS =
[Peer]
PublicKey =
PresharedKey =
AllowedIPs =
Endpoint =
Once pasted the, It should look something similar to below, without any filled information.
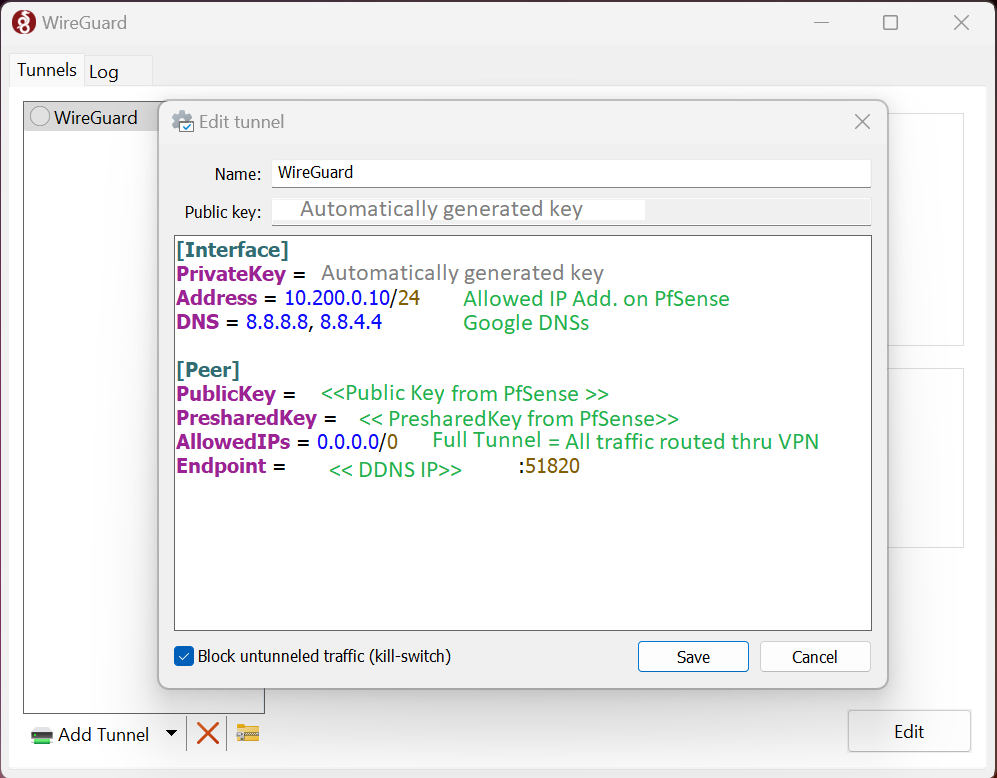
Fill in the details
Address = 10.200.0.10/24 #Allowed IP Address on PfSense /24
DNS = 8.8.8.8, 8.8.4.4 #Google DNS. You can choose any DNS Server
[Peer]
PublicKey = #Publick key of Pfsense Server (step 2.1)
PresharedKey = #PreSharedKey we have generated on Pfsense Server
AllowedIPs = 0.0.0.0/0 # Full Tunnel traffic routed through VPN Server.
Endpoint = DDNS:51820 # Endpoint we wanted to connect from outside of our network
Difference between Full Tunnel & Split Tunnel VPN
Types of VPN Tunnels
- Split - Tunnel VPN: Network traffic only tunnel VPN accesses to your private network (IoT, NAS) , anything outside of your private network, such as (google.com, BBC.com) uses your current network you are in.
If we were to use Split- Tunnels enter our WireGuard VPN Subnet as shown below, followed by Subnet of our local network (e.g NAS, CCTV) device we want to access.
AllowedIPS= 10.200.0.0/24, 10.2.0.0/24
- Full - Tunnel VPN: All network traffic is tunnelled through your home network (Internal (NAS) and External (Google).
If we were to set-up Full VPN Tunnel, which allows all the traffic to be passed through VPN Tunnel, enter the following
AllowedIPS=0.0.0.0/0
We will be setting up Full -Tunnel Network to ensure all the traffic goes through our Home Network, however you can create two Tunnels on WireGuard - one for Full-Tunnel VPN and one for Split Tunnel.
Static & Dynamic IP Address
Endpoint is the device we want to connect to from outside of our Local Network.
- Static IP - Static IP Address stays the same
- Dynamic IP - Changes Occasionally
We need to ensure our IP Address is always direct to our destination IP.
Create a free Dynamic Domain Name Server
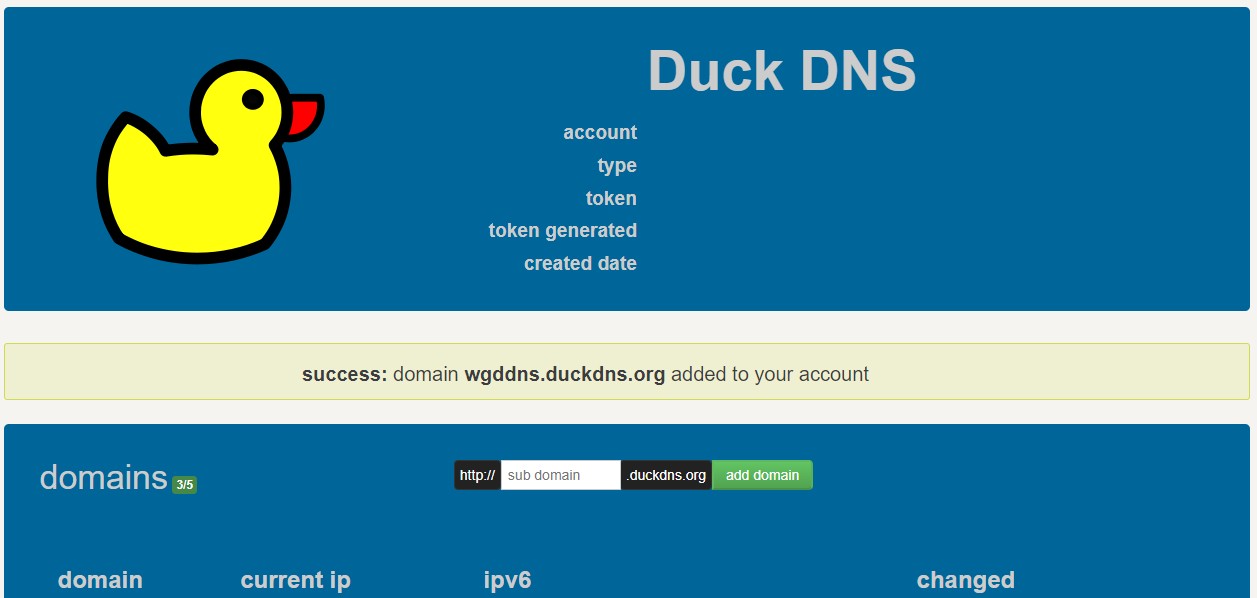
If you have a Dynamic IP Address from your ISP, create a free DDNS using Duckdns.org
- Create a free account on Duckdns.org
- Entre the domain name you want to redirect to your Dynamic IP
- copy and past the IP Address into WireGuard Client followed by Port number.
e.g. wgddns.duckdns.org:51820
Connect to WireGuard VPN
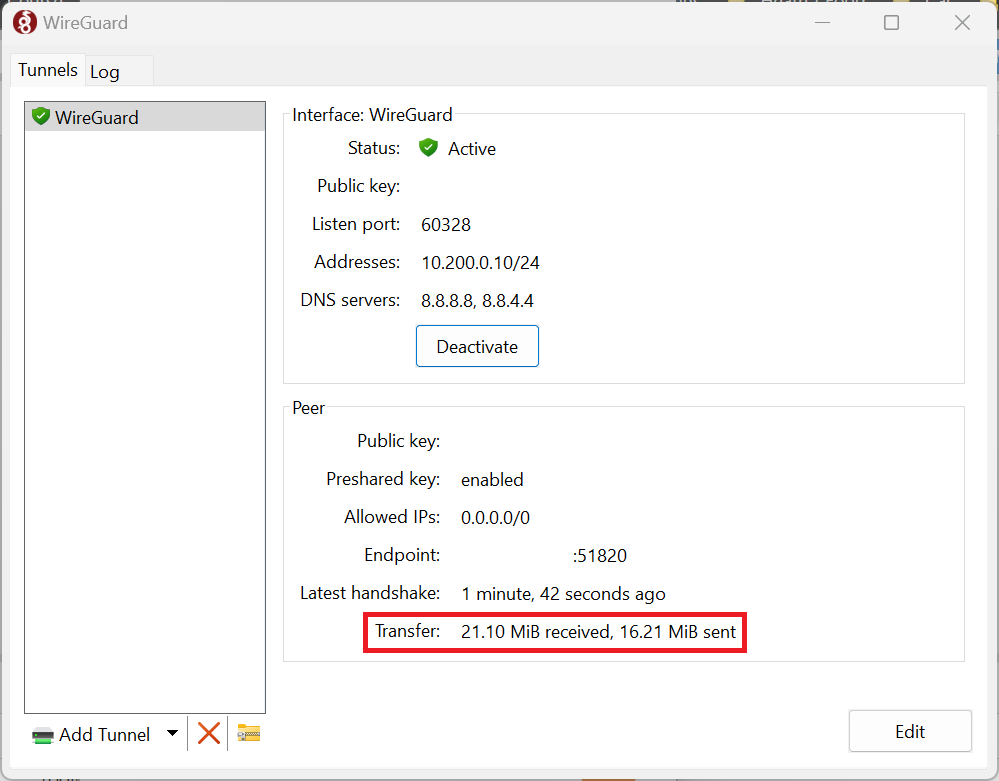
Once all the information has been filled, click on Save button, then click on Activate the WireGuard VPN.
We should see the connection is successful when the Transfer state receives and sent data as shown below.
We can also check pfSense WireGuard Status for connected devices. The green handshake indicate successful connection.
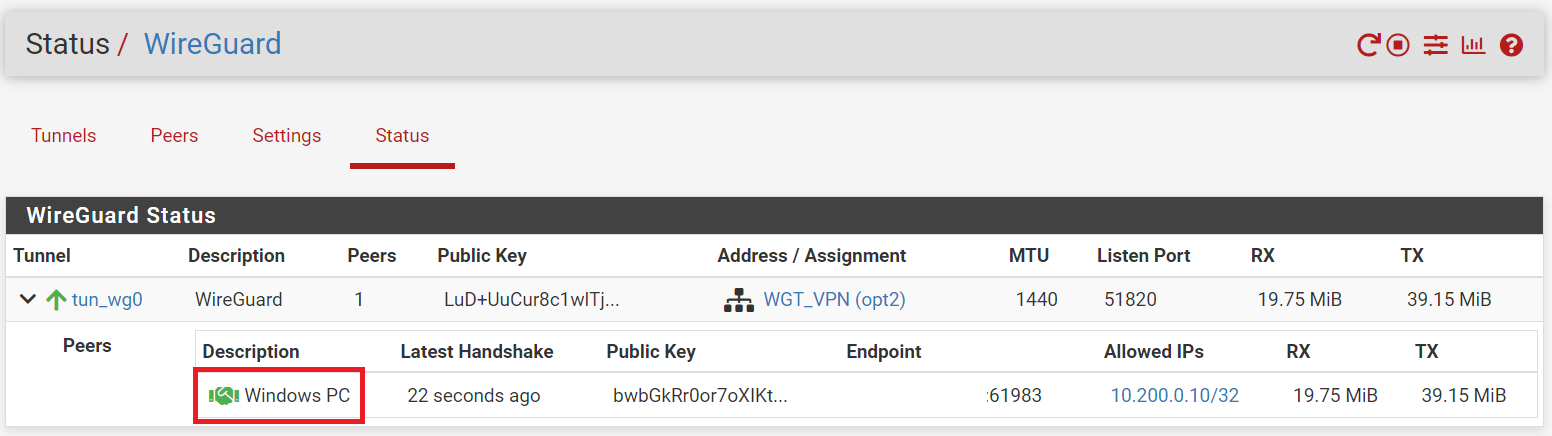
We have successfully connected to WireGuard VPN that uses modern cryptographic algorithm for faster and secure connection with additional layers of security.
If we want to have more clients for Phone, Laptop Tablet, repeat steps 5 and 6.
Member discussion